Pages

Recent Posts

Monday, December 3, 2012

Cheers to You!

This oversized 5 1/2 x 8 1/2 card was created for a colleague.  The color scheme was inspired by a bottle of champagne that we gave to her.


Colors: Basic Black, Whisper White, Champagne
Stamp Sets:  Happy Hour
Accessories:  Tasteful Trim XL Die, Labels Collection Framelits, Champagne Glimmer Paper, Stampin' Dimensionals

Thanks for looking,
~ Maria

Wednesday, September 19, 2012

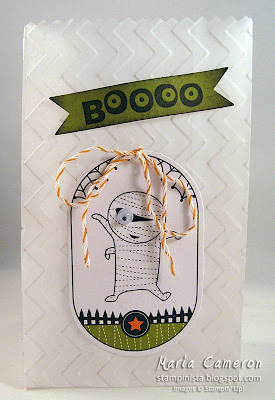
Ghoulish Halloween

Here are three projects that my customers made at a recent Halloween-themed workshop:

PROJECT 1
PROJECT 2
PROJECT 3
Colors:  Tangerine Tango, Lucky Limeade, Basic Gray, Basic Black, Whisper White

Stamp Sets:  Googly Ghouls, Monster Munchies

Accessories:  Project 1: Spider Web Textured Embossing Folder, Whisper White Note Cards & Envelopes, Peekaboo Frames Bigz L Die, Sponge Daubers, Black Stazon Ink, Project 2: Petite Purse Bigz L Die, Small Cello Bags, Basic Gray 1/2" Striped Satin Ribbon, Scalloped Border Punch, Brads, 1 1/4" Square Punch, Project 3: Ghoulish Googlies Designer Kit, Chevron Textured Impressions Embossing Folder, Bitty Banners Framelits Die, Sponge Daubers

Happy Halloween,
~ Maria

Sunday, September 16, 2012

Congratulations New Baby

Here's a card that I made for co-worker's baby shower.  The focal point of this over-sized 5.5 x 8.5 inch card is the adorable Two By Two stamp set.  Since I wanted the paper colors to match the water coloring, I went into the archives and pulled out this retired DSP named Delicate Dots.


Colors:  So Saffron, Crumb Cake, Soft Suede, Bashful Blue, Certainly Celery, Whisper White

Stamps:  Two By Two

Accessories:  Delicate Dots Designer  Series Paper (retired), Labels Collection Framelits Dies, Vintage Faceted Designer Buttons, Linen Thread, Blender Pens, Jet Black Stazon, Saffron Ribbon (retired), Sponge Daubers

Thanks for looking,
~ Maria


Monday, August 13, 2012

Halloween Hex Box

This cute little Halloween hexagon-shaped box was made out of the Stampin' Up! Mini Milk Carton Bigz L die.  My inspiration for the design was the spooky frames that you see at Disneyland's Haunted Mansion.

To create the box, cut 2 milk carton shapes from the die and then trim off the 4th side of each of the cartons so you are left with 2 milk cartons with only 3 sides each.  Fold all score-lines with a Bone Folder and then use Sticky Strip to adhere the 2 cartons together - to make a perfect hexagon shape.


Colors: Lucky Limeade, Tangerine Tango, Basic Black, Basic Gray, Daffodil Delight, Real Red

Stamp Sets: Spooky Bingo Bits

Accessories: Postage Stamp Punch, Tasteful Trim Bigz XL die, Baker's Twine in Lucky Limeade, Blender Pens, Stampin' Sponges, Stampin Dimensionals

Happy Stampin',
~ Maria

Monday, July 2, 2012

Congratulations New Baby

Hello Friends,

Here's a card that I made recently for a friend who just had a baby boy.  I couldn't help but use this adorable retired Designer Series Paper (DSP) from a few years back.


Colors: Soft Sky (retired), Pumpkin Pie, Basic Gray, Chocolate Chip, Tangerine Tango, Daffodil Delight, Whisper White, Staz-on Black


Stamp Sets: Two by Two


Accessories:  Welcome Neighbor DSP (retired), Finishing Touches Edgelits, Labels Collection Framelits, Petal Cone Bigz L Die (used for banner), Blender Pens, Stampin' Dimensionals

Thanks for looking,
~ Maria

Wednesday, May 23, 2012

Bright Blossoms Thank You

Hello Friends,

Here's a card that I made for a friend using the Bright Blossoms stamp set and Summer Smooch Designer Series Paper available in the NEW 2012-2013 catalog available on June 1.


 ColorsRiding Hood Red, Island Indigo, Whisper White

Stamp SetsBright Blossoms (available June 1), A Word For You

AccessoriesSummer Smooch DSP (available June 1), Labels Collection Framelits, Square Lattice Embossing Folder, Extra-Large Oval Punch, Stampin' Dimensionals

Thanks for looking,
Maria

Wednesday, December 21, 2011

Paper Piecing Advent Calendar

Hello Friends,

Now that our big Crazy Stamping Ladies Secret Sister Reveal has passed, I can finally post some of the projects that I made for my Secret Sister, Lisa.  Here is the holiday gift that I made for her.  Unfortunately, I was home sick and missed the party so my gift was delivered to her a bit late.  I hope she liked it...

This project was created using the "Paper Piecing" technique.  The advent calendar was purchased from Michaels and started out as raw wood (approximately 24"x12").  I photocopied the entire item and then used the copies to make templates to trace onto Designer Series Paper (DSP).  I used a variety of retired DSP in Real Red, Old Olive and Basic Black.  After I cut out the pieces, I shaded them with Sponge Daubers and glued them on the wood. 

The calendar was created by printing numbers on the DSP using Microsoft Word and my regular printer.  I removed the wood handles on the doors, painted them gold and then reapplied them after I attached the paper.

The finishing details included the snow paint and Dazzling Diamonds on Santa's hat, Real Red and Whisper White Satin Ribbon on the presents and some glitter and Crystal Effects on the star.

Happy Holidays!
~ Maria