Pages

Recent Posts

Sunday, March 20, 2011

Greenhouse Gala Gift Set

On March 5, the Crazy Stamping Ladies Demonstrator group had our monthly downline meeting and our 1st Qtr Secret Stamping Sister (SSS) Reveal.  Here's the gift I made for my SSS, Theresa.  It included 3 cards, with matching envelopes in a gift box:


Here's a close up of one of the cards:


Colors: Baja Breeze, Pear Pizzazz, So Saffron, Chocolate Chip, Real Red, Whisper White
Stamp SetsJust Believe
Accessories:  Framed Tulips Textured Impressions Embossing Folder Die, Paper Piercing Tool, Pear Pizzazz 1/2 Inch Stitched-Poly Ribbon, Birds & Blooms Stampin' Up! Sizzlits Die 4-Pack, Little Leaves Stampin' Up! Sizzlits Die, Scallop Circle #2 Bigz Die, Modern Label Punch, Movers and Shapers - Modern Label Accessories, Clear Rhinestone Brads, Sponge Daubers, Uni-Ball Signo Gel Pen

Thanks for looking,
~ Maria

Tuesday, March 1, 2011

Punch Bunch For You

Here's a card that I came up with using minimal colors and the new Sale-A-Bration Stamp Set - Punch Bunch:

Colors:  Poppy Parade, Daffodil Delight, Whisper White
Stamp Sets:  Punch Bunch (SAB)
Accessories:  Scallop Trim Border Punch, 1 3/4" Scallop Circle Punch, Elegant Bouquet Textured Impressions Embossing Folder, Basic Pearls, 3/8" Taffeta Ribbon in Whisper White, Sponge Daubers, Stampin' Dimensionals

Thanks for looking,
~ Maria

Monday, February 7, 2011

Build A Purse

Here's a card that I demonstrated at our monthly Crazy Stamping Ladies Stampin' Up! Demonstrator meeting.  The card uses the new Create a Cupcake stamp set and the Build a Cupcake punch to create these adorable little purses.  I got the inspiration from a card that I saw on Terri Mongeon's blog.

The base of the purse was created using the "bottom of the cupcake" from Build a Cupcake punch turned upside down.  The purse handle was made by punching a ring from the 1/2 inch circle and 3/4 inch circle punches.  The trick to get an evenly-spaced ring is to punch the smaller of the two circles first and then punch the larger one.  The purse flap was created by cutting a 3/4 inch circle in half.

Colors:  Riding Hood Red, Basic Black, Whisper White
Stamp Sets: Create a Cupcake, Birthday Bakery (Hostess Level 1)
Accessories:   Build a Cupcake XL Punch, Basic Rhinestones Jewel Accents, Rockabilly Specialty Designer Series Paper (retired), 3/4 inch Circle Punch, 1/2 inc Circle Punch

Thanks for stopping by,
~ Maria

Friday, January 7, 2011

Holiday Card Workshop 1

In December, I held my second annual Holiday Card Workshop.  Each attendee made 20 cards, 4 each of 5 different designs.  Here is one of the cards we made - the Reindeer Gift Card Holder.

 
I found the idea for the gift card from fellow Stampin' Up! Demonstrator Kay Kalthoff's blog.

The gift card holder is made from the Two Tags Stampin' Up! Bigz Die.  To create the tag, fold an 8-1/2 x 3 inch piece of card stock in half and place the fold on the die just below the flat end of the tag as pictured here and run it through the BigShot.
Here is another picture after running through the BigShot:


Here is a photo of the gift card open:


ColorsReal Red, Chocolate Chip, Baja Breeze, Old Olive, Crumb Cake, Whisper White
Stamp Sets: Punch Pals
Accessories:  Two-Step Owl Punch, Snowflake Punch, Word Window Punch, Corner Rounder, 5/8" Striped Ribbon in Real Red (retired), Red Pom Poms from craft store (for nose), Sponge Daubers, Stampin' Dimensionals

 Check back soon for my other holiday cards.

Take care,
~ Maria

Thursday, December 30, 2010

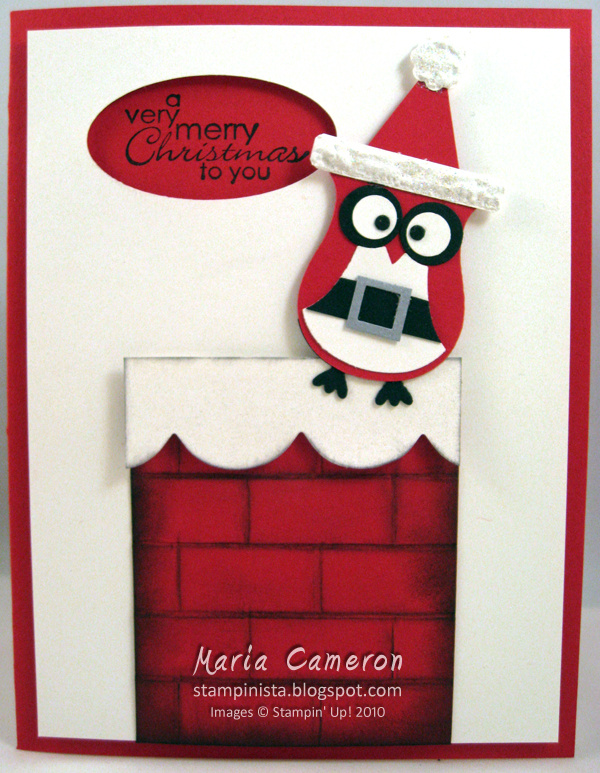
Up on the Rooftop

I just love this little owl - he has so many personalities.  Here he is dressed as Santa - Up on the Rooftop.  I got the idea from a fellow demonstrator's gift tag swap.  I don't know where she got the idea from so I can't give credit to the original creator, but here is my version:


Colors:  Real Red, Basic Black, Whisper White, Silver
Stamp Sets:  Best Yet (retired)
Accessories:  Two-Step Owl Punch, Large Oval Punch, Boho Blossoms (top of hat), Tasteful Trim Bigz Die (snow), Dazzling Diamonds, Snow Paint from craft store.   The hat was created by hand and the chimney was created using a Martha Stewart Score Board.

Happy Holidays,
~ Maria

Tuesday, December 21, 2010

Deck The Halls Christmas Tree

On December 4, my Stampin' Up! Demonstrator Group, The Crazy Stamping Ladies,  finally had our big Secret Stamping Sister reveal so now I can post pictures of the gifts I made for MY secret sister, Lyn.  Here are pictures of her final gift for Christmas - Deck The Halls Christmas Tree:

Side 1:

Side 2:


Close Up:

 Close up of presents:
I bought the unfinished wood Christmas Tree at Michaels and decided to decoupage it using Stampin' Up's Deck The Halls Designer Series Paper.  After adhering the paper with Mod Podge and doing some heavy sanding and sponging, I put another layer of Mod Podge on top and then sprinkled it with Dazzling Diamonds glitter to give it a glistening effect.

Here are the rest of the supplies I used to make this fun holiday project:

Colors:  Always Artichoke, Cherry Cobbler, Early Espresso, Very Vanilla
Accessories: 
[STAR-TREE TOPPER] Silver Glass Glitter
[BOWS] 1/2 Inch Seam Binding Ribbon in Always Artichoke, Cherry Cobbler and Very Vanilla
[SNOWFLAKES] Northern Frost Decorative Strip Die, Vanilla snowflakes sponged with Early Espresso and spritzed with White Shimmer Paint
[BIRDS] Merry Details Stampin' Up! Sizzlits Die, Cobbler birds sponged with Early Espresso and spritzed with White Shimmer Paint
[BUTTONS] Deck The Halls Big Designer Buttons, tied knots with Hemp Twine and 1/8 Inch Taffeta Ribbon in Early Espresso
[PRESENTS] Matchbox Stampin' Up! Bigz Xl Die using Deck The Halls DSP and Seam Binding Ribbon
[SNOW] Purchased Snow Paint from Michaels and sprinkled with Dazzling Diamonds
[ADHESIVE] I glued the bows on with a hot glue gun and adhered the glass glitter to the star using Tombo Adhesive.  The snowflakes, birds and buttons were adhered with dimensionals and glue dots.

I hope you liked the project.  Happy Holidays to you and your families!

Thanks for stopping by,
~ Maria

Saturday, November 27, 2010

On The Green

Here's a card that I made for my boyfriend's birthday last week.  I thought the golfer went nicely with the argyle-patterned paper:


ColorsPear Pizzazz, Basic Black, Whisper White
Stamp SetsOn The Green
Accessories 1/2" Stitched Poly Ribbon in Pear Pizzazz, Build-a-Bear Workshop Pawsitively Prints II Designer Series Paper, Movers and Shapers Die with 2" Circle

Thanks for looking,
~ Maria